
Creating your first WordPress website might seem intimidating, especially if you think you need coding skills and don’t have time to learn HTML, CSS, and other web development languages. But with a bit of guidance and patience, you can set up a beautiful, fully functional website for your personal blog, portfolio, or business without writing a single line of code.
If you’ve been meaning to launch your website on WordPress but aren’t sure where to begin, this guide is for you. We will cover all the brass tacks, right from choosing a domain to how you can extend your site’s functionality without coding.
Here’s an overview of what we are going to take you through in our guide on how to make a WordPress Website:
- Choosing WordPress
- Picking a domain name
- Getting hosting for your site
- Developing your site layout/structure
- Familiarizing with the WordPress UI
- Setting up the basics
- Choosing a theme
- Extending site functionality
- Bonus Content
Let’s get into it.
Step 1: Choosing WordPress
WordPress is not the only content management system you can use to build a website. There are more than 100 CMS platforms, as listed by Wikipedia.
Still, WordPress remains most people’s favorite. Recent data from W3Techs shows that the platform powers 43.2% of websites on the internet. This is for obvious reasons: a WordPress website is easy to customize, SEO-friendly, and can be managed even from a mobile device. Sites built on the platform are also secure and mobile responsive, which has been particularly crucial since Google moved to the ‘mobile-first’ indexing algorithm.
To get started, visit the official website and download the latest version of WordPress. You will then follow their 5-minute guide on how to install the download. The process is straightforward, and no technical skills are required.
Step 2: Choosing Your Domain Name
What is a domain name? This may seem obvious to you, but I have seen people ask this question in various WordPress communities. Simply put, a domain name is a website’s address on the internet. Just like you have a home address that helps the delivery guy locate you, your domain name is used by internet users to find your website.
Choosing your domain name is one of the most crucial steps in making your WordPress website.
You need to get it right the first time because changing the domain name when your website is already established can hurt your rankings if not done correctly.
If you already have a business or brand, you can use your brand name to come up with a domain name for your WordPress Website. If the site is going to be a personal blog, you can use your name as the domain name.
Just make sure the domain name is:
- Short, easy to remember, and spell
- Unique
- Without numbers or special characters
- Brandable
Once you’ve ensured that your domain name satisfies the above standards, you can proceed to the next step.
Step 3: Finding a Trusted Web Host
The success of your WordPress website greatly relies on the host company you choose to work with. Why? Because the hosting service you choose has a significant impact on your site’s speed.
The hosting company provides servers where your website’s files are stored. Every time a visitor loads your site, it is the server’s responsibility to serve the requested files. If the hosting company has inadequate resources, it becomes difficult for them to handle site requests, which can significantly slow down your website.
That, in a nutshell, is why you need to do your due diligence when picking a web hosting company. Before signing up, check their uptime guarantee, server performance, customer support, and security features. A little research upfront can save you from endless headaches later.
HostPinnacle is one of the trusted web host companies in Kenya, and one we have been using for almost a year. Their resources are adequate, and we haven’t experienced any downtime with them so far. Their customer support is superb, too; you can even chat with them on WhatsApp at any time of the day.
Step 4: Creating a Site Structure or Layout
As a WordPress website designer, I have come to realize that planning every element of the website before the actual design process begins is crucial. With a clear plan of what you want and where you want it, you will make fewer mistakes, saving on time that would have been wasted had you chosen to design without a plan.
So, what plans should you make?
Here are the must-dos:
Design the Layout
How do you want your site to appear before visitors? This is an important question to ask yourself.
Your site layout refers to the arrangement of elements and sections on your website. A well-structured layout improves the user experience. And since Google rewards sites that are easy to navigate, it also boosts your SEO.
You can design your website’s layout using wireframe design tools or plot it on a piece of paper. For beginners, I generally recommend the latter because wireframe tools have a slight learning curve. Plus, you’ll almost certainly need to pay to unlock all the features.
Choose your Website Colors and Fonts
A good number of novice WordPress website designers that I have worked with often forget to pick their fonts and colors before beginning the actual development. This is a mistake I would not want you to make.
Choosing the colors to use in your site is just as important as choosing your domain. That’s because both help define and showcase your brand in the best light.
Sticking with the colors you are already using on your brand is always an option. But if you want to overhaul your brand identity and have your site reflect that, you can go through the color selection process again. Neil Patel’s guide on color psychology offers helpful tips for choosing website colors intentionally.
As for fonts, the two most commonly used types are serif and sans-serif. Serif fonts have a decorative stroke on the finishing of their letters; sans-serif fonts do not:

Ensure that the fonts you choose are easy to read and safe for the web. WordPress comes with a selection of built-in fonts, many of which are sourced from Google Fonts. If you want more variety, you can always explore the full Google Fonts library and add any font you like to your site.
If you’d rather not spend too much time choosing a font, simply pick one of the web-safe fonts. Here are some of the most popular options:
- Arial
- Verdana
- Open Sans
- Source Sans Pro
- Helvetica
- Trebuchet
- Times New Roman
- Georgia
Create the Basic Pages
Another step in creating your WordPress Website structure is to note down the number of pages you want, depending on the purpose they will serve. Examples of standard pages include:
- A “Home” page
- An “About Us” page
- A “Privacy Policy” page, and
- A “Contact Us/Me” page.
Quick Tip: You can choose to insert the contact information on your About Us page.
Once you’ve chosen your site colors, fonts, and determined the pages you want to display on your site, you can move to the next step.
Step 5: Understanding the WordPress Dashboard UI
To have an easy time working with WordPress, you must understand what each section in your dashboard does. The picture below shows what the WordPress dashboard looks like:
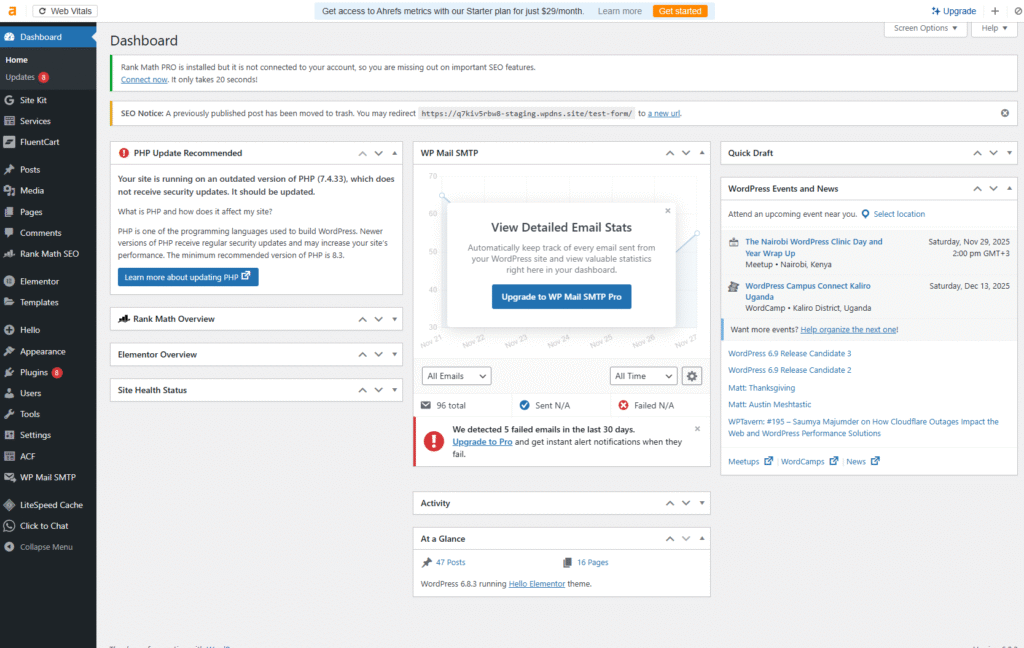
- Dashboard – displays all site activity, including comments, scheduled posts, and recently published content. You can also check for theme and plugin updates from this section. It serves as the homepage of your WordPress CMS.
- Posts– where you add new posts or edit existing ones. This section also allows you to create new categories and tags to use on your site.
- Media – you can upload new images to your website here or edit existing ones.
- Pages – this section allows you to add new pages and edit those that you’ve already created.
- Comments – this section allows you to manage comments made on your posts
- Appearance – this is where you can choose your theme, customize it, and set up your site menu. If you are familiar with CSS and HTML, you can also edit the theme from here.
- Plugins – this section allows you to install new plugins and manage the existing ones.
- Users – if you plan on having multiple authors or an editor for your site, you can add them all from this section.
- Tools – The tools section allows you to convert tags to categories and vice versa. You can also import and export items such as comments, tags, and categories. It also allows you to check your site health and manage your data.
In the settings section, you set up the basics of your site, including permalinks, social profiles, privacy policies, cookie notices, media settings, and your reading and writing preferences.
Step 6: Choosing Your WordPress Website Theme
A theme in WordPress refers to a collection of style sheets and templates that define the layout of your site. WordPress has over 7,400 themes that you can choose from. To add or manage your WordPress website theme, head to the Appearance section.
Click on “Themes” and then click “Add New.”
There are thousands of themes that you can choose to work with from the Library. Most themes offer both a free version and a premium version. As you’d expect, free versions have limited features and don’t allow for much customization. That’s why I always recommend opting for a paid version of the theme you’ve chosen. This way, you will have access to all the features, customization options, and support.
For illustrative purposes, we will use Astra. It is a popular WordPress theme liked for its lightweight nature and amazing layout options.
Step 7: Setting Up the Basics
Having fully familiarized yourself with the WordPress UI, it is now time to set up the basics of your WordPress website. This is where you will set the default colors and fonts. You will also set the site permalink structure, title, tagline, logo, and favicon.
Let’s take a look at setting up each of them.
Step 1: Head Over to the Appearance Section and Click on “Customize”
The “Customize” section allows you to add your WordPress Website logo, Favicon, title, tagline, and other theme settings. Clicking on it will open up your theme menu. We want to set the site identity, so we will only focus on that.
Step 2: Click on the Header, then Site Identity
This will give you the option to add the logo, favicon, title, and tagline:
- Add logo and favicon by uploading them
- Insert Title and Tagline
- Setting up site color and fonts
Step 3: In the Appearance Section, click on Global
This will open a new section from which you can set the typography, colors, and appearance of elements, such as containers. Customize each to your liking.
Step 4: Set Your Permalink Structure
To set your site’s permalink structure, which is very important in SEO, head back to the main dashboard and click on Settings. Next, click on Permalink and choose the structure you want to use for your post.
Recommendation: Take the time to study the best permalink structures and how they affect your site’s SEO.
Keep in mind that you don’t have to complete your theme setup all at once; you can always come back and finish after you’ve designed the layout and added content to your site.
Step 8: Adding Content to the Site
Any WordPress website comes with two default content types: posts and pages. Posts refer to the blogs and any dynamic content you regularly publish, while the pages are static type content.
Let’s add some posts and pages to our site:
To add a new page, click on the page section and then Add New. This will launch the editor. Give your page a name and add any other elements that you wish to have. You have the option to embed video links, images, and text. Once you’ve finished creating the page, hit publish, and your page will go live.
The process for adding a new post to your WordPress website is almost the same as adding a new page. The only difference is that we will begin by clicking on the posts section. This will also launch the editor. Add your post title and body.
You can then add images, videos, or audio in your post’s body. If you have several categories on your site, ensure that you assign a category to your page before publishing.
Another critical step is to insert a featured image in your post. This is what appears as a preview when sharing the post or on your homepage.
Step 8: Customizing Your Site
Once you’ve chosen your theme and set the basics, you can start customizing the appearance of your WordPress Website. Using the layout you prepared, arrange the elements on a new page as desired. If you want to display this page as your home template instead of the stock display set by the theme, you need to change some settings.
On your dashboard, head over to the Settings section, click on Reading, and where you have the front-page settings, change it to the Static Page option.
You can then choose the page you want to display as your homepage. Once you’ve selected the page, click on Save Changes to apply your changes.
Whether you are using a page builder like Elementor or the WordPress customizer to create templates for your site, everything is done in a simple drag-and-drop manner. This saves time and allows you to make changes without altering HTML and CSS code.
Step 9: Extending Site Functionality
To extend the functionality of your WordPress Website, you will have to install plugins. A plugin on WordPress is more like an application that allows you to add cool features to your website. Some plugins will help you to improve site security, speed, or even collect emails from your readers.
With over 56,500 plugins available on WordPress, you can be guaranteed you will get a solution for whatever need you may have.
Bonus Content
Here are extra tips and tools to help you make your site faster, more attractive, and more effective.
Page Builders
Page builders are plugins that allow you to create pages from scratch or customize existing ones by simply dragging and dropping elements into place. They come in handy when you want to customize your site beyond your theme’s limitations.
Some of the most popular page builders on WordPress include Elementor, Beaver Builder, and Oxygen. Currently, Elementor is the most popular, with over 5 million active installations. You can use either the free version or the Pro plan, which costs $49 per year for one site.
Elementor allows you to create and customize your site with zero limitations. This page builder works best with its Hello theme, which is designed specifically for Elementor.
Site Speed tips
If you want to improve the speed of your WordPress site, ensure that:
- You reduce the number of plugins to a minimum. The more plugins you use, the more resources that have to be loaded, which slows down the site.
- Use standard images like PNG and JPEG. Before using an image, compress it with a tool like tinypng. This reduces their size, improving loading speeds.
You can also install site optimization plugins like WP Rocket, WP Super Cache, or LightSpeed Cache. These help your site load faster by handling caching and other performance tweaks.
SEO
The success of any website greatly relies on its SEO performance. No lie, SEO can be somewhat technical, but with tools like Rank Math, you can easily tweak and improve your site’s performance.
Another popular tool that you can use to optimize your site’s search visibility is Yoast SEO. This plugin offers a free version with extended features in the pro version.
Final take
Creating a WordPress website is entirely doable, even for beginners. You just need to be able to follow instructional guides (like the one you just read) and dedicate sufficient time to learning the ropes. But even with thorough guidance, it’s easy to feel overwhelmed.
Plus, building the website is only half of the equation. Running it effectively and growing its impact over time requires ongoing effort and dedication. SEO constantly evolves as Google updates its algorithms, content marketing demands regular testing to see what truly engages your audience, and website security requires continuous monitoring.
For many business owners, juggling all of this while running daily operations can feel overwhelming and exhausting. That’s where Onmedia comes in.
We handle every aspect of your WordPress website, from building and customizing it to optimizing speed, implementing SEO, managing security, and keeping it up to date. We’ll also run your content marketing so your site not only works flawlessly but also attracts and engages your audience.
Enlist our help, and you’ll never have to worry about the technical details, maintenance, or time commitment of running your site.
